Nextcloud is an open-source, self-hosted file sync and file share platform similar to Dropbox, OneDrive, and other proprietary online storage services. It is a fork of Owncloud with 100% open source.
If you’re looking for a self-hosted file share and sync platform, then Nextcloud should be a good place to start. I’ll show you how to install and configure Nextcloud on your own Ubuntu server with an Nginx web server and a remote PlanetScale cloud database.
Nginx installation
Nextcloud requires a web server to function, and Nginx is my choice. To install Nginx on Ubuntu, run the commands below:
sudo apt update
sudo apt install nginx
Just leave the Nginx installed, we will configure the Nginx in the next sections.
Nginx version consideration:
If you’re preferring the newest mainline version of Nginx, you can install it by following the official guides.
PHP installation
Ubuntu has packages for all required PHP modules, just install them. Here, I’m going to use PHP 8.1 for example.
Required PHP modules
First, have the PHP FastCGI Process Manager (FPM) installed, other related PHP modules will be installed along with php-fpm:
Then, install other PHP modules. The required modules for Nextcloud are:
- PHP 7.4 or 8.1 (recommended)
- PHP module ctype
- PHP module curl
- PHP module dom
- PHP module filter (only on Mageia and FreeBSD)
- PHP module GD
- PHP module hash (only on FreeBSD)
- PHP module JSON (included with PHP >= 8.0)
- PHP module libxml (Linux package libxml2 must be >= 2.7.0)
- PHP module mbstring
- PHP module openssl (included with PHP >= 8.0)
- PHP module posix
- PHP module session
- PHP module SimpleXML
- PHP module XMLReader
- PHP module XMLWriter
- PHP module zip
- PHP module zlib
Check the installed PHP modules by php -m.
Any missing modules can be installed via apt. For example, to install the PHP module curl, just run sudo apt install php-curl.
Probably, you need to further install the following modules:
sudo apt install php-curl php-dom php-gd php-mbstring php-zip
For database connection, we need to install one of the following modules:
- PHP module pdo_sqlite (>= 3, usually not recommended for performance reasons)
- PHP module pdo_mysql (MySQL/MariaDB)
- PHP module pdo_pgsql (PostgreSQL)
Since I’m going to use PlanetScale database (MySQL-compatible serverless database), just install the php-mysql module:
sudo apt install php-mysql
Also, Nextcloud has recommended several packages, go ahead to install them.
Recommended packages
- PHP module fileinfo (highly recommended, enhances file analysis performance)
- PHP module bz2 (recommended, required for extraction of apps)
- PHP module intl (increases language translation performance and fixes sorting of non-ASCII characters)
sudo apt install php-fileinfo php-bz2 php-intl
Required for specific apps
- PHP module ldap (for LDAP integration)
- PHP module smbclient (SMB/CIFS integration, see SMB/CIFS)
- PHP module ftp (for FTP storage / external user authentication)
- PHP module imap (for external user authentication)
- PHP module bcmath (for passwordless login)
- PHP module gmp (for passwordless login, for SFTP storage)
- PHP module exif (for image rotation in pictures app)
Except for smbclient, other modules are easy to configure:
sudo apt install php-ldap php-ftp php-imap php-bcmath php-gmp php-exif
For more details about SMB, please read the Nextcloud docs.
Select one of the following memcaches:
- PHP module apcu (>= 4.0.6)
- PHP module memcached
- PHP module redis (>= 2.2.6, required for Transactional File Locking)
I’m going to use the APCu, configurations will be included in the next optimisation section.
sudo apt install php-apcu
For preview generation (optional)
- PHP module imagick
- avconv or ffmpeg
- OpenOffice or LibreOffice
Well, I’m not going to use Office suits in Nextcloud, just ignore them…
sudo apt install php-imagick ffmpeg
PlanetScale database
PlanetScale provides a free hobby option with the following limits:
5GB storage/mo
1 billion row reads/mo
10 million row writes/mo
Check the pricing page for more details, I’m okay with the free version for personal Nextcloud usage…
PlanetScale environment set up
First, use the PlanetScale CLI (pscale) to set up a local proxy for the cloud database, which is available as downloadable binaries from the releases page.
For Ubuntu, download the .deb file, e.g.:
wget "https://github.com/planetscale/cli/releases/download/v0.91.0/pscale_0.91.0_linux_arm64.deb"
Here, I’m running Ubuntu on an ARM-architecture server, choose the corresponding version of your server.
Then install the pscale CLI:
sudo dpkg -i ./pscale_0.91.0_linux_arm64.deb

# check it's working
pscale --help

# remove the deb file, no longer needed
# rm ./pscale_0.91.0_linux_arm64.deb
Also, pscale requires the MySQL command-line client to function, install it via apt:
sudo apt install mysql-client
Create and connect database
Create a database
After installing the pscale CLI, sign in to PlanetScale with this command:
You can now use pscale to create a new database:
pscale db create nextcloud-database
Currently, the following regions are supported , with their respective slugs:
- US East - Northern Virginia
us-east - US West - Oregon
us-west - EU West - Dublin
eu-west - Asia Pacific - Mumbai
ap-south - Asia Pacific - Singapore
ap-southeast - Asia Pacific - Tokyo
ap-northeast
Create new database with specific region, eu-west for example:
pscale db create <database-name> --region eu-west
Select the region closet to your server to reduce latency.
Connect to the database
Connect to the cloud database with the following command:
pscale connect nextcloud-database main
Here, it’s connected to the main branch of the nextcloud-database database. For more about the branching features of the PlanetScale database, see Branching.
Make sure it’s running well, and check it’s running on 127.0.0.1:3306, or other ports if 3306 was already used.
Now, the PlanetScale MySQL database is ready, just treated it as a local running database.
Install Nextcloud
Keep the pscale connect running, and start a new SSH connection to your server.
Back to the installation of Nextcloud:
Go to the Nextcloud Download Page.
Go to Download Nextcloud Server > Community Projects > Archive, and download either the tar.bz2 or .zip archive. For example:
wget https://download.nextcloud.com/server/releases/latest.zip
This downloads a file named latest.zip.
Now you can extract the archive contents. Run the appropriate unpacking command for your archive type:
This unpacks a single nextcloud directory. Move the nextcloud directory to its final destination. For Nginx:
sudo mv ./nextcloud/ /usr/share/nginx/

# check it's existing
# ls -l /usr/share/nginx/
Change the ownership of the nextcloud directory to the HTTP user (www-data):
sudo chown -R www-data:www-data /usr/share/nginx/nextcloud/
Use the Nextcloud occ command to complete the installation:
cd /usr/share/nginx/nextcloud/

sudo -u www-data php occ maintenance:install \
--database "mysql" --database-name "nextcloud-database" \
--database-user "root" --database-pass "" --database-host "127.0.0.1" \
--admin-user "<your-admin-name>" --admin-pass "<your-password>" --admin-email "<your-email>"
This might take several minutes to finish the installation as Nextcloud populates database schema to PlanetScale, please wait. When it’s done, you should see:
Nextcloud was successfully installed
Notes: The database name should be the same as you created with pscale db create. There’s no need to fill in the database password, leave it blank as "". I found that I cannot install with too complicated admin-pass, so choose a simple password and then change the password in the Nextcloud web interface after installation.
Connect to the cloud-hosted database
After the Nextcloud was installed, we can leave off the pscale CLI for proxying the database.
First, create a new password for our database with pscale CLI, e.g.:
# usage
# pscale password create <database> <branch> <name>

pscale password create nextcloud-database main db-admin
Keep a record of the generated credentials, it will only show once.
Now, setting the /usr/share/nginx/nextcloud/config/config.php file for directly connected to the remote PlanetScale database:
  'dbname' => 'nextcloud-database',
  'dbhost' => '<your-db-host>',
  'dbport' => '',
  'dbuser' => '<your-db-user-name>',
  'dbpassword' => '<your-db-password>',
  'dbdriveroptions' =>
  array (
    PDO::MYSQL_ATTR_SSL_CA => '/etc/ssl/certs/ca-certificates.crt',
  ),
If you’re using other systems, change the root CA cert path correspondingly. See root CA configuration for more details.
Then, check the database connection with sudo -u www-data php /usr/share/nginx/nextcloud/occ status, should have no error prompts.
Just copied it from Nextcloud’s document, which it’s working well.
For example, create a configuration file as /etc/nginx/conf.d/cloud.example.com.conf with the following contents:
upstream php-handler {
    server unix:/var/run/php/php8.1-fpm.sock;
}

server {
    listen 80;
    listen [::]:80;
    server_name cloud.example.com;

    return 301 https://$host$request_uri;
}

server {
    listen 443 ssl http2;
    listen [::]:443 ssl http2;
    server_name cloud.example.com;

    # Path to the root of your installation
    root /usr/share/nginx/nextcloud;
    resolver [2606:4700:4700::1111] 9.9.9.9 1.1.1.1 [2620:fe::fe];

    # Use Mozilla's guidelines for SSL/TLS settings
    # https://mozilla.github.io/server-side-tls/ssl-config-generator/

    ssl_certificate <path-to>/fullchain.pem;
    ssl_certificate_key <path-to>/priv.pem;

    # OCSP stapling
    ssl_stapling on;
    ssl_stapling_verify on;
    ssl_trusted_certificate <path-to>/fullchain.pem;

    # SSL cache for returned visitors
    ssl_session_cache shared:MozSSL:10m; # about 40000 sessions
    ssl_session_timeout 1d;
    ssl_session_tickets off;

    # https://ssl-config.mozilla.org
    # intermediate configuration
    ssl_protocols TLSv1.2 TLSv1.3;
    ssl_ciphers ECDHE-ECDSA-AES128-GCM-SHA256:ECDHE-RSA-AES128-GCM-SHA256:ECDHE-ECDSA-AES256-GCM-SHA384:ECDHE-RSA-AES256-GCM-SHA384:ECDHE-ECDSA-CHACHA20-POLY1305:ECDHE-RSA-CHACHA20-POLY1305:DHE-RSA-AES128-GCM-SHA256:DHE-RSA-AES256-GCM-SHA384;
    ssl_prefer_server_ciphers off;


    access_log /var/log/nginx/access.log main;
    error_log /var/log/nginx/error.log error;


    # HTTP response headers borrowed from Nextcloud `.htaccess`
    add_header Referrer-Policy "no-referrer" always;
    add_header X-Content-Type-Options "nosniff" always;
    add_header X-Download-Options "noopen" always;
    add_header X-Frame-Options "SAMEORIGIN" always;
    add_header X-Permitted-Cross-Domain-Policies "none" always;
    add_header X-Robots-Tag "none" always;
    add_header X-XSS-Protection "1; mode=block" always;
    add_header Strict-Transport-Security "max-age=15552001" always;

    # Remove X-Powered-By, which is an information leak
    fastcgi_hide_header X-Powered-By;

    index index.php index.html /index.php$request_uri;

    # set max upload size
    client_max_body_size 256M;
    fastcgi_buffers 64 4K;

    # Enable gzip but do not remove ETag headers
    gzip on;
    gzip_vary on;
    gzip_comp_level 4;
    gzip_min_length 256;
    gzip_proxied expired no-cache no-store private no_last_modified no_etag auth;
    gzip_types application/atom+xml application/javascript application/json application/ld+json application/manifest+json application/rss+xml application/vnd.geo+json application/vnd.ms-fontobject application/x-font-ttf application/x-web-app-manifest+json application/xhtml+xml application/xml font/opentype image/bmp image/svg+xml image/x-icon text/cache-manifest text/css text/plain text/vcard text/vnd.rim.location.xloc text/vtt text/x-component text/x-cross-domain-policy;

    # Rule borrowed from `.htaccess` to handle Microsoft DAV clients
    location = / {
        if ( $http_user_agent ~ ^DavClnt ) {
            return 302 /remote.php/webdav/$is_args$args;
        }
    }

    location = /robots.txt {
        return 200 'User-agent: *\nDisallow: /\n';
        access_log off;
    }

    # Make a regex exception for `/.well-known` so that clients can still
    # access it despite the existence of the regex rule
    # `location ~ /(\.|autotest|...)` which would otherwise handle requests
    # for `/.well-known`.
    location ^~ /.well-known {
        # The rules in this block are an adaptation of the rules
        # in `.htaccess` that concern `/.well-known`.

        location = /.well-known/carddav {
            return 301 /remote.php/dav/;
        }
        location = /.well-known/caldav {
            return 301 /remote.php/dav/;
        }

        location /.well-known/acme-challenge {
            try_files $uri $uri/ =404;
        }
        location /.well-known/pki-validation {
            try_files $uri $uri/ =404;
        }

        # Let Nextcloud's API for `/.well-known` URIs handle all other
        # requests by passing them to the front-end controller.
        return 301 /index.php$request_uri;
    }

    # Rules borrowed from `.htaccess` to hide certain paths from clients
    location ~ ^/(?:build|tests|config|lib|3rdparty|templates|data)(?:$|/) {
        return 404;
    }
    location ~ ^/(?:\.|autotest|occ|issue|indie|db_|console) {
        return 404;
    }

    # Ensure this block, which passes PHP files to the PHP process, is above the blocks
    # which handle static assets (as seen below). If this block is not declared first,
    # then Nginx will encounter an infinite rewriting loop when it prepends `/index.php`
    # to the URI, resulting in a HTTP 500 error response.
    location ~ \.php(?:$|/) {
        fastcgi_split_path_info ^(.+?\.php)(/.*)$;
        set $path_info $fastcgi_path_info;

        try_files $fastcgi_script_name =404;

        include fastcgi_params;
        fastcgi_param SCRIPT_FILENAME $document_root$fastcgi_script_name;
        fastcgi_param PATH_INFO $path_info;
        fastcgi_param HTTPS on;

        fastcgi_param modHeadersAvailable true; # Avoid sending the security headers twice
        fastcgi_param front_controller_active true; # Enable pretty urls
        fastcgi_pass php-handler;

        fastcgi_intercept_errors on;
        fastcgi_request_buffering off;

        fastcgi_max_temp_file_size 512M;
    }

    location ~ \.(?:css|js|svg|gif|png|jpg|ico)$ {
        try_files $uri /index.php$request_uri;
        expires 7d; # Cache-Control policy borrowed from `.htaccess`
        access_log off; # Optional: Don't log access to assets
    }

    # location ~ \.woff2?$ {
    #     try_files $uri /index.php$request_uri;
    #     expires 7d; # Cache-Control policy borrowed from `.htaccess`
    #     access_log off; # Optional: Don't log access to assets
    # }

    # Rule borrowed from `.htaccess`
    location /remote {
        return 301 /remote.php$request_uri;
    }

    location / {
        try_files $uri $uri/ /index.php$request_uri;
    }
}
Adjust the configuration with your domain name.
Note that we haven’t got SSL certs yet. It’s very easy with acme.sh, please find my previous post Free ZeroSSL wildcard SSL certificates with acme.sh DNS API to get the cert keys, and replace them with the correct file path of the certs file in the Nginx configuration.
Now, go back to the /usr/share/nginx/nextcloud/config/ folder. The custom domain(s) should be added in the config.php:
sudo nano /var/www/nextcloud/config/config.php
Adjust the following snippets:
  'trusted_domains' =>
  array (
    0 => 'localhost',
    1 => 'cloud.example.com',
    2 => 'next.example.com',
  ),
Yes, we can add multiple domains, but don’t forget to set the corresponding virtual server(s) in Nginx…
Also, add nginx to the user group of www-data that Nginx can access to the unix:/var/run/php/php8.1-fpm.sock:
sudo usermod -a -G www-data nginx
Restart nginx and php8.1-fpm:
sudo systemctl restart nginx
sudo systemctl restart php8.1-fpm
Now, it’s time to visit the Nextcloud instance through the custom domain.
remember to update password if weak password was used during installation
Nextcloud optimisation
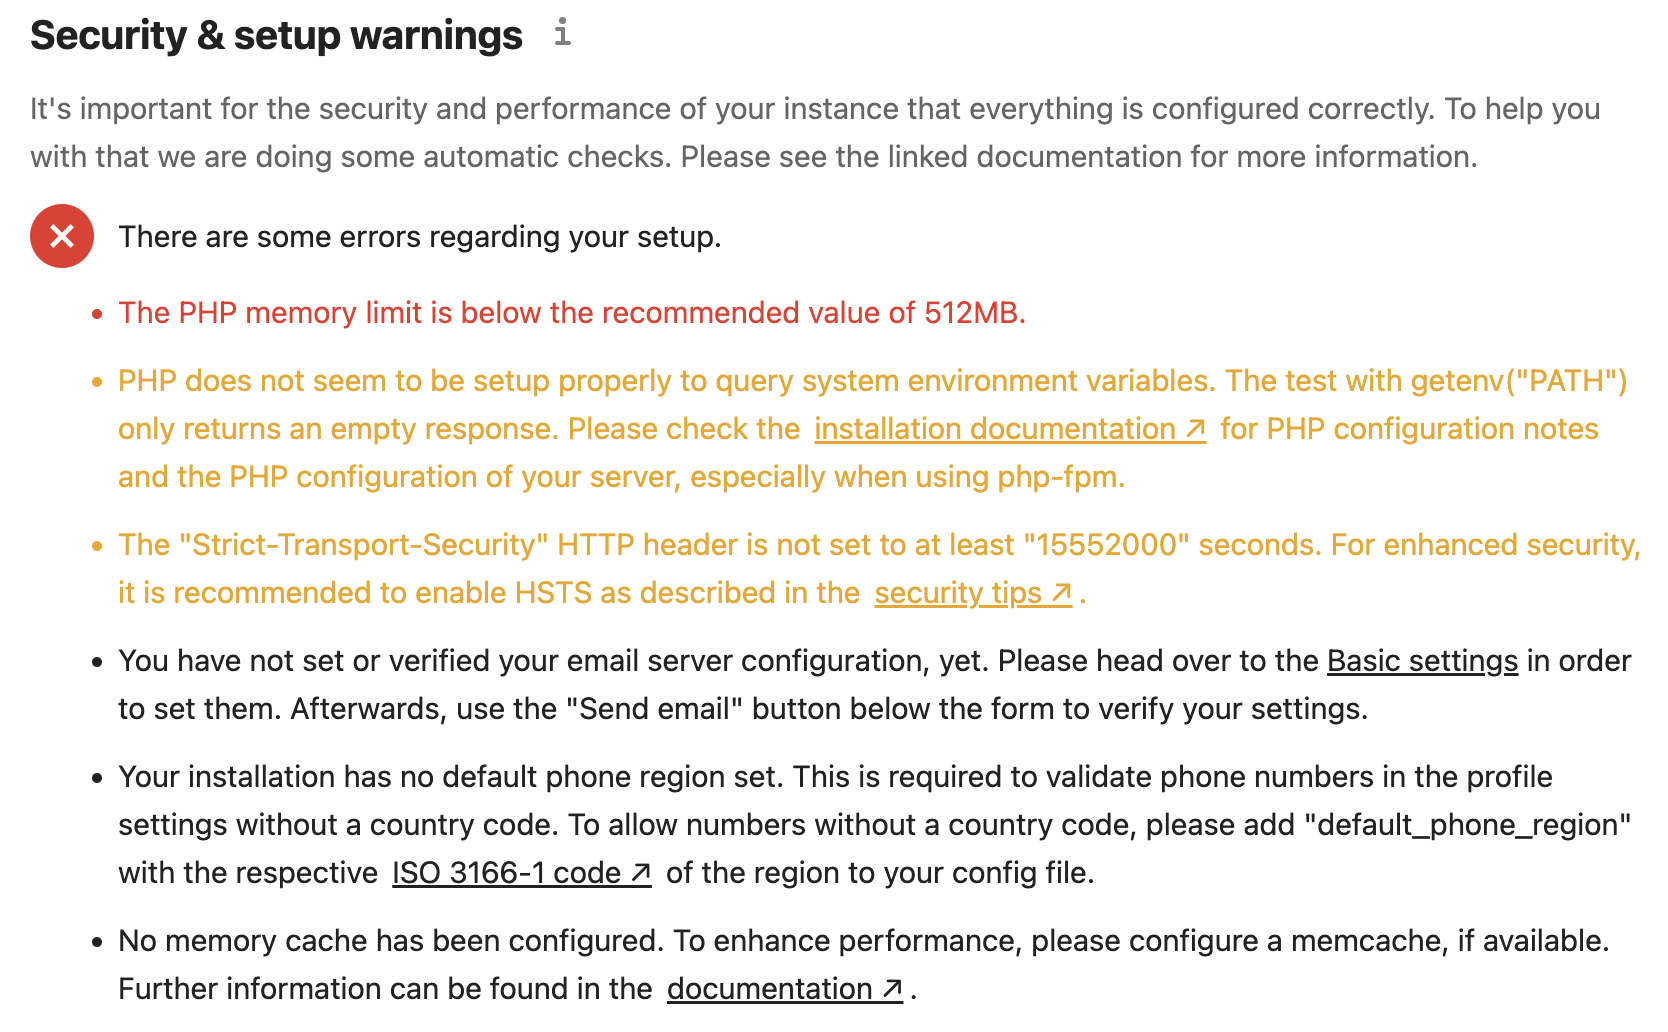
Under https://cloud.example.com/settings/admin/overview/, several Security & setup warnings might be shown.

Let’s further optimise the php and nginx configurations for better security and performance.
php-fpm configuration notes
Referred to the Nextcloud installation guide.
php.ini file used by the web server (php-fpm) is:
And the php.ini used by the php-cli and so by the Nextcloud CRON jobs is:
system environment
First, go to the web server configuration. In php-fpm, the system environment variables like PATH, TPM, or others are not automatically populated in the same way as when using php-cli. A PHP call like getenv('PATH') can therefore return an empty result. Manually configure it in /etc/php/8.1/fpm/pool.d/www.conf. Usually, you will find some or all of the environment variables already in the file, but commented out like this:
;env[HOSTNAME] = $HOSTNAME
;env[PATH] = /usr/local/bin:/usr/bin:/bin
;env[TMP] = /tmp
;env[TMPDIR] = /tmp
;env[TEMP] = /tmp
Uncomment the appropriate existing entries (remove the leading ;), and uncommenting this line:
maximum upload size
To increase the maximum upload size, we also need to modify the php-fpm configuration and increase the upload_max_filesize and post_max_size values in /etc/php/8.1/fpm/php.ini.
post_max_size: “Sets max size of post data allowed. This setting also affects file upload. To upload large files, this value must be larger than upload_max_filesize.”
– https://stackoverflow.com/questions/23686505/php-post-max-size-vs-upload-max-filesize-what-is-the-difference
Update accordingly in the Nginx configuration file for the client_max_body_size entry.
You will need to restart php-fpm and Nginx to make these changes to be applied.
sudo systemctl restart php8.1-fpm
sudo systemctl reload nginx
If you’re proxying the Nextcloud by Cloudflare, note that Cloudflare limits the upload size (HTTP POST request size):
- 100MB Free and Pro
- 200MB Business
- 500MB Enterprise by default
increase memory limit
To increase the PHP memory limit, edit it in the /etc/php/8.1/fpm/pool.d/www.conf, like this:
php_admin_value[memory_limit] = 2G
Memory caching
We can significantly improve the Nextcloud server performance with memory caching, where frequently-requested objects are stored in memory for faster retrieval. A memcache is not required and you may safely ignore the warning if you prefer.
Nextcloud supports multiple memory caching backends, so you can choose the type of memcache that best fits your needs. The supported caching backends are:
APCu, APCu 4.0.6 and up required.
A local cache for systems.
Redis, PHP module 2.2.6 and up required.
For local and distributed caching as well as transactional file locking.
Memcached
For distributed caching.
Memcaches must be explicitly configured in Nextcloud by installing and enabling your desired cache, and then adding the appropriate entry to config.php (See Configuration Parameters for an overview of all possible config parameters).
Recommended caches are APCu and Redis. Here we go.
APCu
APCu is a data cache, and it is available in most Linux distributions. As we already installed the php-apcu, add this line to the /usr/share/nginx/nextcloud/config/config.php file:
'memcache.local' => '\OC\Memcache\APCu',
APCu is disabled by default on CLI which could cause issues with nextcloud’s cron jobs. Please make sure you set the apc.enable_cli to 1 on your php.ini config file or append --define apc.enable_cli=1 to the cron job call.
I’m setting it at /etc/php/8.1/mods-available/apcu.ini:
extension=apcu.so
apc.enable_cli=1
It’s very tricky to set the apc.enable_cli, as discussed here: https://github.com/nextcloud/server/issues/27781.
And then check it’s working:
sudo -u www-data php /usr/share/nginx/nextcloud/occ status
The error message looks like this:
OCP\HintException: [0]: Memcache \OC\Memcache\APCu not available for local cache (Is the matching PHP module installed and enabled?)
If no error message is outputted by sudo -u www-data php /usr/share/nginx/nextcloud/occ status, the APCu is correctly configured.
Additional notes for Redis vs. APCu on memory caching
APCu is faster at local caching than Redis. If you have enough memory, use APCu for Memory Caching and Redis for File Locking. If you are low on memory, use Redis for both.
External storage
External storage is disabled by default. Enable it in Apps > Disabled apps of the Nextcloud web interface. Then add external storage under Settings > Administration > External storage.