Although Netlify provides CDN service, Cloudflare has more edge locations around the world. What’s more, Netlify hosted sites are hardly reached in China, while Cloudflare still lives. With this in mind, I decided to switch to Cloudflare for load balancing.
However, pushing post/file changes to Netlify did not clear Cloudflare’s cache, that’s a mess. So, I’m going to use Cloudflare’s API together with Netlify’s outgoing webhook to make the cache in the same pace.
Cloudflare API
In Cloudflare’s API document, we cloud find a service named Purge All Files, which remove ALL files from Cloudflare’s cache.
If you’re enterprise user of Cloudflare, you can refer to other APIs like Purge Files by Cache-Tags or Host to control detailed purge process.
Using this API, we need to POST to its API endpoint: POST zones/:identifier/purge_cache. For example, using cURL:
curl -X POST "https://api.cloudflare.com/client/v4/zones/023e105f4ecef8ad9ca31a8372d0c353/purge_cache" \
     -H "X-Auth-Email: user@example.com" \
     -H "Authorization: Bearer c2547eb745079dac9320b638f5e225cf483cc5cfdda41" \
     -H "Content-Type: application/json" \
     --data '{"purge_everything":true}'
The required parameters are:
:identifier: this is the unique ID for your domain, find it in Cloudflare dashboard
X-Auth-Email: this is the email address you’ve used to log in to Cloudflare
Authorization: this is the API token that can be generated on the Cloudflare API Tokens page
Purge Cloudflare cache with a serverless function
Now we can create a serverless function to purge Cloudflare’s cache. Here, I’m going to demonstrate with Netlify Functions for this purpose.
Just create a new function in Netlify:
const axios = require("axios")

exports.handler = (event, context, callback) => {

    const headers = {
        "X-Auth-Email": `${process.env.CF_EMAIL}`,
        "Authorization": `Bearer ${process.env.CF_PURGE_KEY}`,
        "Content-Type": "application/json"
    }

    const callbackHeaders = {
        "Content-Type": "application/vnd.api+json; charset=utf=8"
    }

    let url = `https://api.cloudflare.com/client/v4/zones/${process.env.CF_ZONE_ID}/purge_cache`
    let data = '{ "purge_everything": true }'

    if (event.headers["x-netlify-event"]) {
        axios.post(url, data, {
                headers: headers
            })
            .then((res) => {
                callback(null, {
                    statusCode: 200,
                    headers: callbackHeaders,
                    body: JSON.stringify(res.data),
                });
            })
            .catch((err) => {
                callback(null, {
                    statusCode: 500,
                    headers: callbackHeaders,
                    body: JSON.stringify(err.message),
                })
            })
    } else {
        // TO-DO, for non-Netlify triggers
        // may just ignore
    }
}
Don’t forget to set the corresponding Environment variables in Netlify’s web interface.
Set up Netlify to trigger the cache purge
Now that you have the serverless function running on Netlify backend, the next step is to instruct Netlify to trigger the function after a successful deployment. To do this, navigate to settings on Netlify’s website, and click the Build & Deploy tab.
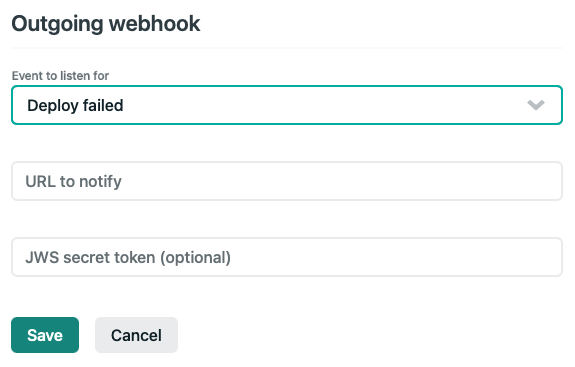
Scroll down to the bottom of the page to the Deploy Notifications section. Click on the Add Notification dropdown, and select Outgoing Webhook. Use the following settings to instruct Netlify to trigger your Cloudflare cache purge function after a successful deployment.

Set the URL to notify to the Netlify Function’s endpoint that you just created.
Secure with JWS token
If you planned to provide a JWS secret token for the Netlify outgoing webhook (as shown in the above image), just need to update the serverless function as follows:
const axios = require("axios")
const jwt = require("jsonwebtoken")

exports.handler = (event, context, callback) => {

    const headers = {
        "X-Auth-Email": `${process.env.CF_EMAIL}`,
        "Authorization": `Bearer ${process.env.CF_PURGE_KEY}`,
        "Content-Type": "application/json"
    }

    const callbackHeaders = {
        "Content-Type": "application/vnd.api+json; charset=utf=8"
    }

    let url = `https://api.cloudflare.com/client/v4/zones/${process.env.CF_ZONE_ID}/purge_cache`
    let data = '{ "purge_everything": true }'

    const signature = req.headers['x-webhook-signature']
    const decodedSignature = jwt.verify(signature, process.env.JWS_SECRET)

    if (decodedSignature.iss === 'netlify') {
        axios.post(url, data, {
                headers: headers
            })
            .then((res) => {
                callback(null, {
                    statusCode: 200,
                    headers: callbackHeaders,
                    body: JSON.stringify(res.data),
                });
            })
            .catch((err) => {
                callback(null, {
                    statusCode: 500,
                    headers: callbackHeaders,
                    body: JSON.stringify(err.message),
                })
            })
    } else {
        // TO-DO, for non-Netlify triggers
    }
}
Don’t forget to set the Environment variables JWS_SECRET in Netlify’s web interface with the same token string you’ve putted in the webhook setting form. I’ve used a random generated string for the JWS_SECRET, just feed this string to the field required in the above image mentioned in previous section…