Colour Theme
Well, I choose Dracula theme (a dark theme) for my Terminal.app. There are many more themes available in the lysyi3m/macos-terminal-themes repository. All the installation steps are the same, so just choose the right one suits for you.
Here are the steps to install the Dracula colour theme for Terminal.app:
- Download the Dracula File, unzip it.
- Now in Terminal.app, open Preferences…, and switch to Profiles tab.
- Click the Gear icon (⚙︎) at the bottom-left corner.
- Click Import…
- Select the Dracula.terminal file in the folder you just downloaded.
- Focus on the Dracula theme then click Default to make this colour theme default. Then restart the Terminal.app.
For my VS Code, using the same Dracula theme, just fine…
Zsh
Zsh is a shell designed for interactive use, although it is also a powerful scripting language. Many of the useful features of bash, ksh, and tcsh were incorporated into zsh; many original features were added.
😎 It seems that on macOS BigSur, the default shell application is zsh now… So, you don’t need to manually install zsh anymore.
Install it via brew:
Then change the default shell to zsh rather than bash (the default on Mac OSX), run the following command in terminal:
Install zsh-syntax-highlighting for colouring commands when typing in terminal:
brew install zsh-syntax-highlighting
Many other plugins could found at zsh-users. And enable it in the .zshrc file:
cd ~
touch .zshrc
echo 'source /usr/local/share/zsh-syntax-highlighting/zsh-syntax-highlighting.zsh' >> ~/.zshrc
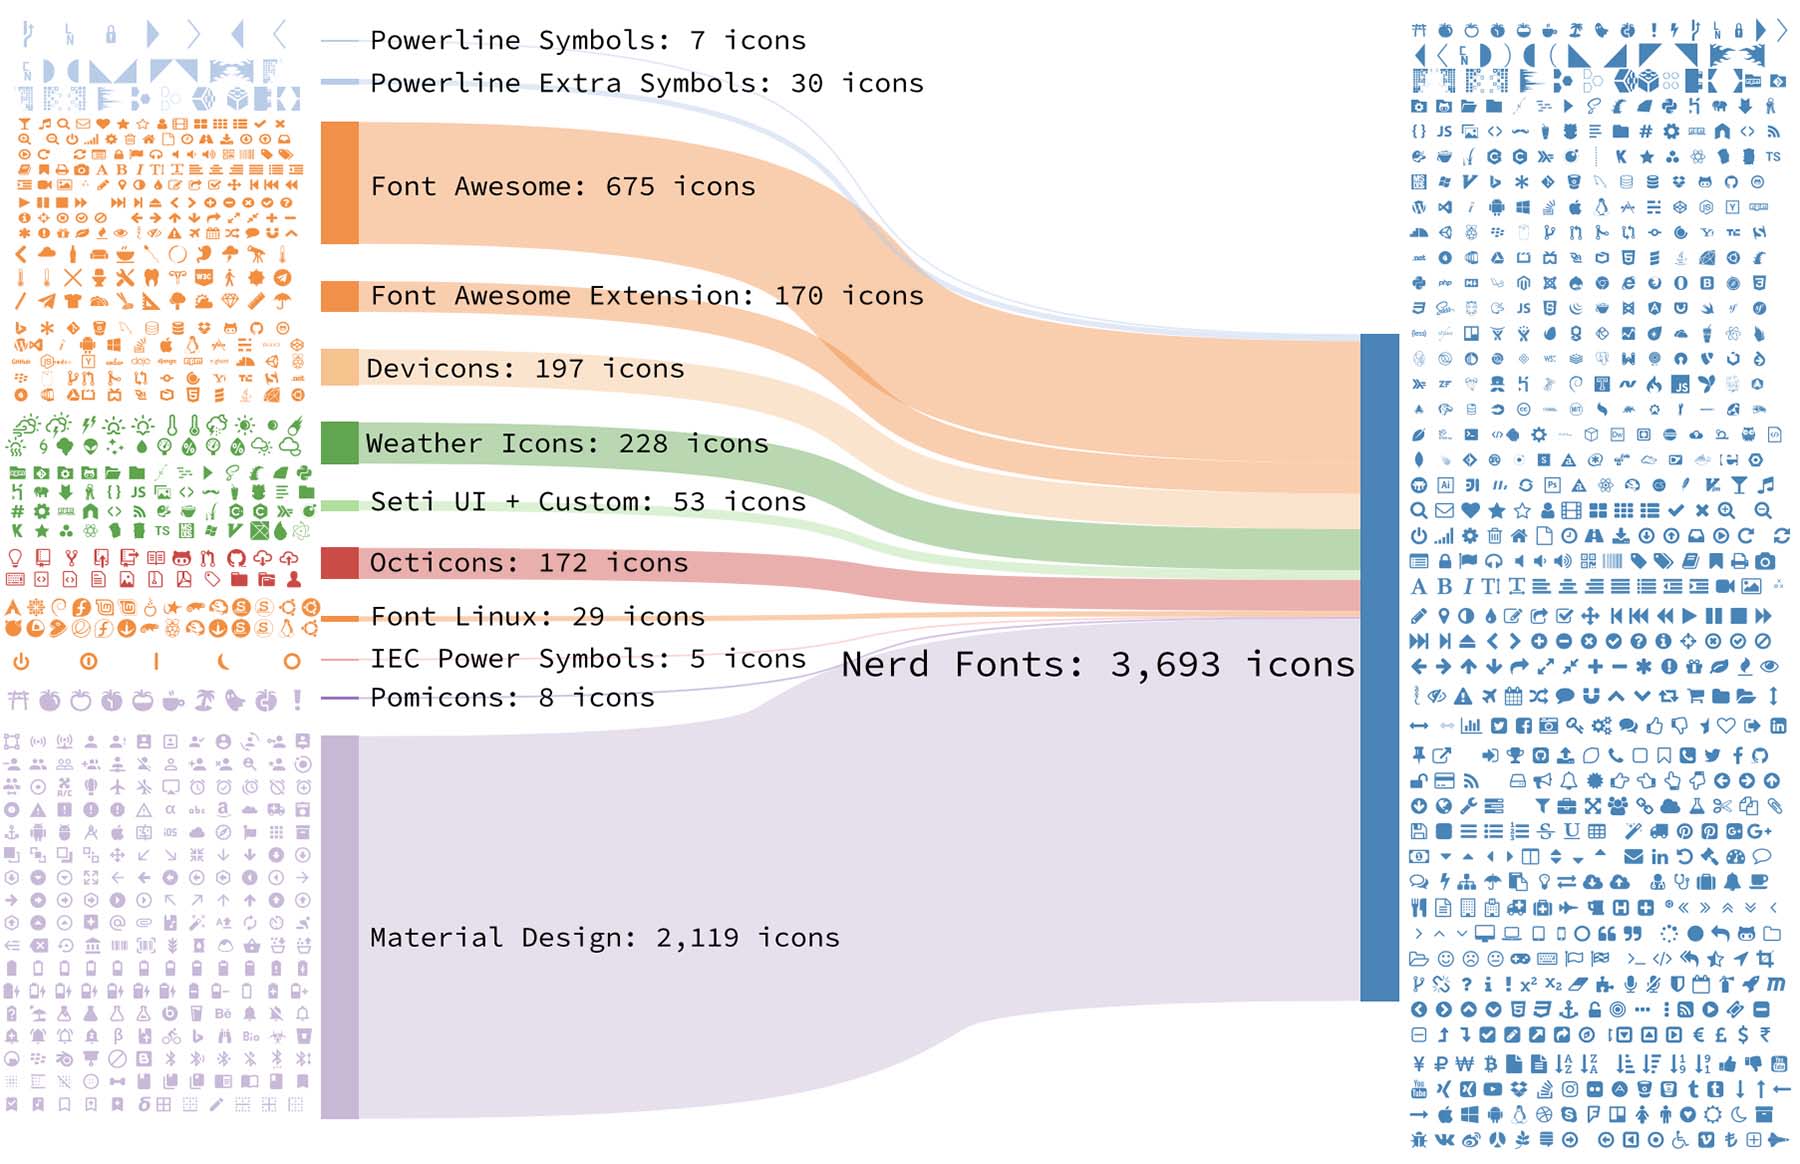
Nerd Fonts
Nerd Fonts is a project that patches developer targeted fonts with a high number of glyphs (icons). Specifically to add a high number of extra glyphs from popular ‘iconic fonts’ such as Font Awesome ➶, Devicons ➶, Octicons ➶, and others.
This font includes lots of icons, which makes the terminal more interactive.

Since I also need Fira Code, I chose to install the font-firacode-nerd-font:
brew cask install font-firacode-nerd-font
Next, enable this font in Terminal.app:
Preferences > Profiles > Text > Font > Change... > FuraCode Nerd Font
Don’t be surprised by the name of the font in the options, it’s a RFN (Reserved Font Name) for Fira Code Nerd Font.
If you’re also use VS Code, don’t forget to update the font settings for terminal in VS Code to make Nerd Fonts working.
Currently, I’m using “Operator Mono” fonts, a patched version can be downloaded here.
Powerlevel9k
I’m switching to powerlevel10k, see next section below for configurations.
There are many themes for zsh, one of my favourites is powerlevel9k, follow the steps to install it:
echo "POWERLEVEL9K_MODE='nerdfont-complete'" >> ~/.zshrc
git clone https://github.com/bhilburn/powerlevel9k.git ~/.powerlevel9k
echo 'source  ~/.powerlevel9k/powerlevel9k.zsh-theme' >> ~/.zshrc
Notice that I used a hidden folder .powerlevel9k for storing the files. Also, the font needs to be set before powerlevel9k is initialised in the ~/.zshrc.
Powerlevel9k is highly configurable. To change your setup, open your ~/.zshrc and add in the configuration you prefer. Here is what I used in my ~/.zshrc:
source /usr/local/share/zsh-syntax-highlighting/zsh-syntax-highlighting.zsh
POWERLEVEL9K_MODE='nerdfont-complete'
source ~/.powerlevel9k/powerlevel9k.zsh-theme
POWERLEVEL9K_LEFT_PROMPT_ELEMENTS=(ssh dir vcs newline status)
POWERLEVEL9K_RIGHT_PROMPT_ELEMENTS=()
POWERLEVEL9K_PROMPT_ADD_NEWLINE=true
There is even a Show Off Your Config page, you can find other developer’s custom configurations for powerlevel9k. These configurations also affect the appearance of terminal inside VS Code.
Powerlevel10k
The appearance of powerlevel10k is similar to 9k, but it’s much easier to configure.
Manually install it:
git clone --depth=1 https://github.com/romkatv/powerlevel10k.git ~/.powerlevel10k
echo 'source ~/.powerlevel10k/powerlevel10k.zsh-theme' >> ~/.zshrc
source ~/.zshrc
This is the simplest kind of installation. It will prompt you the steps to configure the styles.
You can re-config powerlevel10k at anytime if you’re not satisfied by the previous applied styles via:
Well, that’s all for my current configurations in Terminal.app, enjoy it and happing coding…